Extended ACLs
Extended ACLs allow you can be more precise in the packet filtering. You can evaluate the source and destination IP addresses, the type of the layer 3 protocol, source and destination port, and other parameters. Extended access lists are harder to configure and require more processor time than the standard access lists, but they enable a much more granular level of control.
Two steps are required to configure extended ACLs:
1. configure an extended ACL using the following command:
R1(config) access list ACL_NUMBER permit|deny PROTOCOL SOURCE_ADDRESS WILDCARD_MASK [PROTOCOL_INFORMATION] DESTINATION_ADDRESS WILDCARD_MASK [PROTOCOL_INFORMATION]
2. apply an access list to an interface using the following command:
R1(config) ip access-group ACL_NUMBER in | out
To better understand the usefulness of extended ACLs, consider the following example.
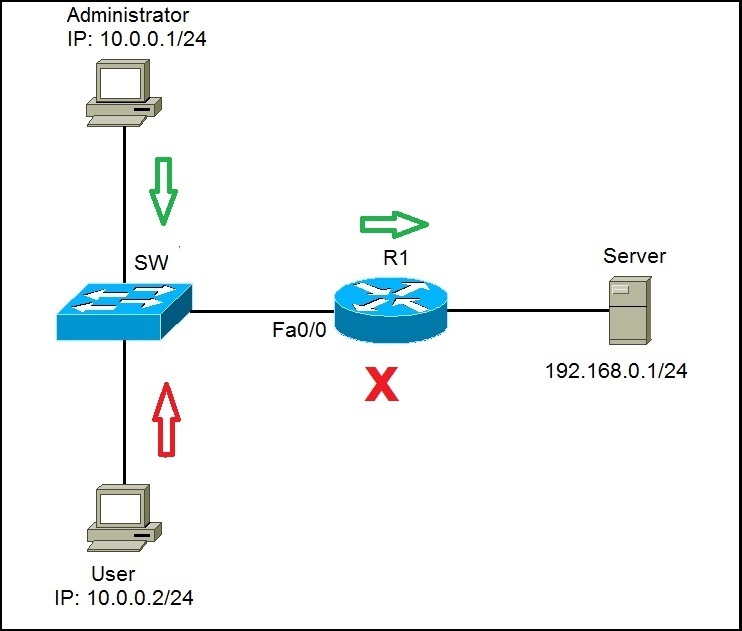
We want to enable the administrator’s workstation (10.0.0.1/24) unrestricted access to Server (192.168.0.1/24). We will also deny any type of access to the user’s workstation (10.0.0.2/24).
First, we will create a statement that will permit the administrator’s workstation access to Server:
Now, we need to create a statement that will deny the user’s workstation access to Server:
Lastly, we need to apply the access list to the Fa0/0 interface on R1:
The command above will force the router to evaluate all packets trying to enter Fa0/0. If the administrator tries to access Server, the traffic will be allowed, because of the first statement. However, if User tries to access Server, the traffic will be forbidden because of the second ACL statement.
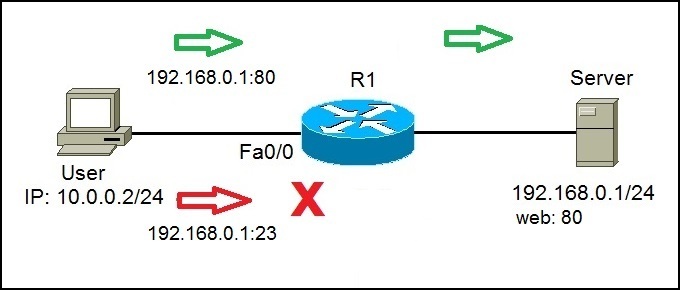
What if we need to allow traffic to Server only for certain services? For example, what if Server was an web server and users should be able to access the web pages stored on Server? Well, we can allow traffic to Server only to certain ports (in this case, port 80), and deny any other type of traffic. Consider the following example:
On the right side, we have a Server that serves as a web server, listening on port 80. We need to permit User to access web sites on S1 (port 80), but we also need to deny other type of access.
First, we need to allow traffic from User to the Server port of 80. We can do that using the following command:
By using the tcp keyword, we can filter packets by source and destionation ports. In the example above, we have permited traffic from 10.0.0.2 to 192.168.0.1 on port 80. The last part of the statement, eq 80, specifies the destination port of 80.
Since at the end of each access list there is an implicit deny all statement, we don’t need to define any more statement. After applying an access list, every traffic not originating from 10.0.0.2 and going to 192.168.0.1:80 will be denied.
We need to apply our access list to the interface:
We can verify whether our configuration was successful by trying to access Server from the User’s workstation using different types of traffic. For example, ping will fail:
Telnet to the port 21 will fail:
However, we will be able to access Server on port 80 using our browser:


