A short introduction to… Nmap

Written by Tuna Peyo on April 21, 2019
Nmap is a robust network security tool written by Gordon Lyon. It was released more than 20 years ago and has since become the de facto standard for network mapping and port scanning. Nmap helps network administrators around the world to discover hosts and services on a computer network and build a map of their network.
Nmap was originally developed for Linux, but it has been ported to most major operating systems, such as Microsoft Windows, HP-UX, Solaris,, etc. Released under the GPL license, Nmap is free to use, study, and modify.
Although usually used for port scanning and network mapping, Nmap can also be used for other purposes, such as:
- host discovery.
- operating system and service version detection.
- finding out network information about targets, such as DNS names, device types, and MAC addresses.
- ability to scan for well-known vulnerabilities.
- host or service uptime monitoring.
Install Nmap on Linux
Some Linux distributions (e.g. Kali Linux) include Nmap by default. To verify whether Nmap is already installed on your system, run the nmap –version command. If the software exists, you should get the following output:
[root@it-courses ~]# nmap --version

Nmap version 6.40 ( http://nmap.org )
Platform: x86_64-redhat-linux-gnu
Compiled with: nmap-liblua-5.2.2 openssl-1.0.1e libpcre-8.32 libpcap-1.5.3 nmap-libdnet-1.12 ipv6
Compiled without:
Available nsock engines: epoll poll select
If Nmap is not installed, you can install it using the appropriate installation manager your distribution is using. Since I’m using CentOS, I will install it using the following command:
[root@it-courses ~]# yum install nmap
If you are using Debian or some other Debian-based Linux distribution, install Nmap by running the sudo apt-get install nmap command.
First scan
Let’s run our first Nmap scan. The official Nmap website offers a target host at scanme.nmap.org that can be scanned as an example. To scan this machine with all the default parameters, simply run the nmap scanme.nmap.org command:
[root@it-courses ~]# nmap scanme.nmap.org

Starting Nmap 6.40 ( http://nmap.org ) at 2017-11-19 00:04 CET
Nmap scan report for scanme.nmap.org (45.33.32.156)
Host is up (0.16s latency).
Not shown: 995 closed ports
PORT STATE SERVICE
22/tcp open ssh
25/tcp filtered smtp
80/tcp open http
514/tcp filtered shell
31337/tcp open Elite

Nmap done: 1 IP address (1 host up) scanned in 99.29 seconds
You can probably figure out the output above – three TCP ports are open. The line 22/tcp open ssh indicates that the TCP port 22 is open, and that the ssh service is probably running on that port.
The scan above works only if your system has Internet access. Of course, you can also scan local hosts. Here is an example:
[root@it-courses ~]# nmap 192.168.5.102

Starting Nmap 6.40 ( http://nmap.org ) at 2017-11-19 00:13 CET
Nmap scan report for 192.168.5.102
Host is up (1.0s latency).
Not shown: 992 closed ports
PORT STATE SERVICE
135/tcp open msrpc
139/tcp open netbios-ssn
445/tcp open microsoft-ds
514/tcp filtered shell
902/tcp open iss-realsecure
912/tcp open apex-mesh
5357/tcp open wsdapi
6000/tcp open X11

Nmap done: 1 IP address (1 host up) scanned in 47.13 seconds
As you can see from the output above, I’ve scanned the local host with an IP address of 192.168.5.102 (it is a Windows 10 host).
Determine service version
You can also use Nmap to determine the version of the software that the target host is running. This can be particularly useful when doing vulnerability assessments, since you really want to know, for example, which web or DNS servers and versions are running on the host, and having the accurate versions helps dramatically in determining which exploits a server is vulnerable to.
You can determine various interesting information using service scans, including:
- the service protocol (e.g. FTP, SSH, Telnet, HTTP).
- the application name (e.g. BIND, Apache httpd).
- the version number.
- the hostname.
- device type (e.g. printer, router).
- the OS family (e.g. Windows, Linux).
To run a service version scan, we use the -sV flags:
[root@it-courses ~]# nmap -sV 192.168.5.102

Starting Nmap 6.40 ( http://nmap.org ) at 2017-11-19 00:22 CET
Nmap scan report for 192.168.5.102
Host is up (3.7s latency).
Not shown: 992 closed ports
PORT STATE SERVICE VERSION
135/tcp open msrpc Microsoft Windows RPC
139/tcp open netbios-ssn
445/tcp open netbios-ssn
514/tcp filtered shell
902/tcp open ssl/vmware-auth VMware Authentication Daemon 1.10 (Uses VNC, SOAP)
912/tcp open vmware-auth VMware Authentication Daemon 1.0 (Uses VNC, SOAP)
5357/tcp open http Microsoft HTTPAPI httpd 2.0 (SSDP/UPnP)
6000/tcp open X11?
Service Info: OS: Windows; CPE: cpe:/o:microsoft:windows

Service detection performed. Please report any incorrect results at http://nmap.org/submit/ .
Nmap done: 1 IP address (1 host up) scanned in 96.07 seconds
Notice how I got more information about services running on the open ports, including their versions.
Scan specific ports
By default, Nmap scans the most common 1,000 ports for each protocol. However, since there are 65535 ports that can be used for service, sometimes you might want to scan very high ports or even individual ports. To do this, the -p flag is used.
Here is a simple example. To scan only the port 135, we can use the following command:
[root@it-courses ~]# nmap -p 135 192.168.5.102

Starting Nmap 6.40 ( http://nmap.org ) at 2017-11-19 00:26 CET
Nmap scan report for 192.168.5.102
Host is up (0.016s latency).
PORT STATE SERVICE
135/tcp open msrpc

Nmap done: 1 IP address (1 host up) scanned in 0.13 seconds
You can also scan a range of ports. This can be done by using the hyphen (-) to specify the range. For example to scan only ports 80 to 90, we would use the following command:
[root@it-courses ~]# nmap -p 80-90 192.168.5.102

Starting Nmap 6.40 ( http://nmap.org ) at 2017-11-19 00:28 CET
Nmap scan report for 192.168.5.102
Host is up (0.96s latency).
PORT STATE SERVICE
80/tcp closed http
81/tcp closed hosts2-ns
82/tcp closed xfer
83/tcp closed mit-ml-dev
84/tcp closed ctf
85/tcp closed mit-ml-dev
86/tcp closed mfcobol
87/tcp closed priv-term-l
88/tcp closed kerberos-sec
89/tcp closed su-mit-tg
90/tcp closed dnsix

Nmap done: 1 IP address (1 host up) scanned in 2.34 seconds
Specify IP address range
You can scan multiple hosts using a single Nmap command. For example, to scan the port 135 on two hosts with IP addresses of 192.168.5.1 and 192.168.5.102, we would use the following command:
[root@it-courses ~]# nmap -p 135 192.168.5.1 192.168.5.102

Starting Nmap 6.40 ( http://nmap.org ) at 2017-11-19 00:31 CET
Nmap scan report for 192.168.5.1
Host is up (0.049s latency).
PORT STATE SERVICE
135/tcp filtered msrpc

Nmap scan report for 192.168.5.102
Host is up (0.046s latency).
PORT STATE SERVICE
135/tcp open msrpc

Nmap done: 2 IP addresses (2 hosts up) scanned in 0.69 seconds
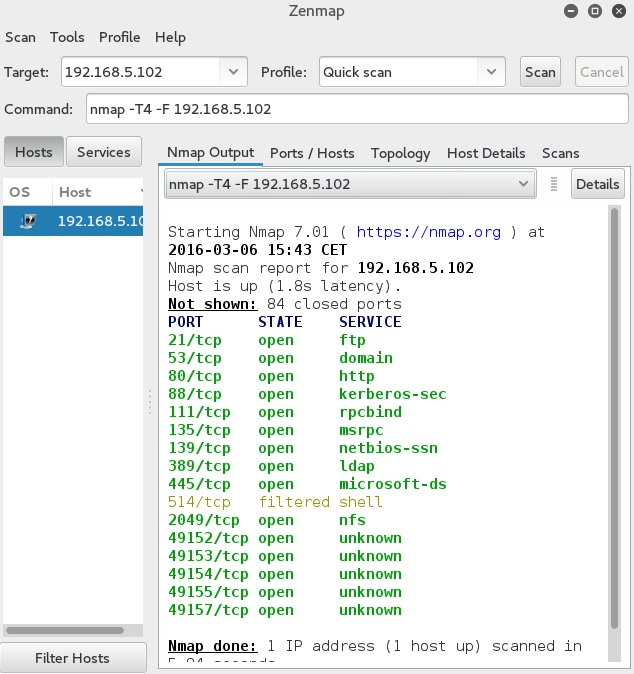
Nmap GUI – Zenmap
Zenmap is a free and open source GUI for Nmap that makes Nmap easier to use for beginners. This software is usually packaged with Nmap itself and is available on many operating systems (Linux, Windows, Mac OS X, BSD, etc.). Some of its features are:
- interactive and graphical results viewing – Zenmap can display Nmap’s normal output, but you can also arrange its display to show all ports on a host or all hosts running a particular service. It summarizes details about a host scan in a convenient display.
- comparison – you can use Zenmap to graphically show the differences between two scans. This can help you to track new hosts or services appearing on their networks, or the existing ones going down.
- repeatability – you can use Zenmap’s command profiles to run the same scan more than once.
- ease of use – Zenmap is easy to use and is especially useful for people without much experience in Linux shell.
Most of the options and fields in Zenmap are pretty straightforward. You simply type the target’s IP address of hostname in the Target field, choose the scan type from the Profile field, and click the Scan button to start the scan. For example, here is how we would run a quick scan against the host with the IP address of 192.168.5.102:
Further reading
Take our free Nmap course here.
This introduction is also available in PDF format:
![]()
