Static NAT configuration
With static NAT, routers or firewalls translate one private IP address to one public IP address. Each private IP address is mapped to a single public IP address. This is the reason why this type of NAT is not used very often – it requires one public IP address for each private IP address.
Three steps are required to configure static NAT:
1. configure private/public IP address mapping using the ip nat inside source static PRIVATE_IP PUBLIC_IP command
2. configure the router’s inside interface using the ip nat inside command
3. configure the router’s outside interface using the ip nat outside command
Consider the following example:
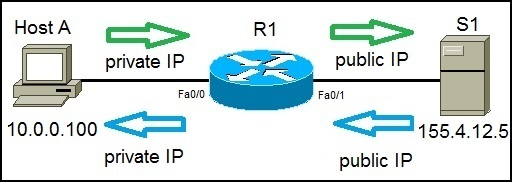
Host A requests a web resource from S1. Host A uses its private IP address when sending the request to the router R1, which serves as a default gateway. Router R1 receives the request, changes the private IP address to the public one and sends the request to S1. S1 responds to R1. R1 receives the response, looks up in its NAT table and changes the destination IP address to the private IP address of Host A.
Here is how we can configure static NAT in the example above:
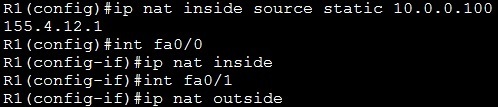
The first command was used to configure a static mapping between Host A’s private IP address of 10.0.0.100 and router’s R1 public IP address of 155.4.12.1. We’ve then defined the inside and outside interfaces. To verify NAT, we can use the show ip nat translations command:

In the picture above, you can see that the translation has been made between the Host A’s private IP address (Inside local) to the R1’s public IP address (Inside global). Outside global represents an address of a host on the Internet. Outside local also represents the outside host.