Dynamic NAT
Unlike with static NAT, where you had to manually define a static mapping between a private and a public address, dynamic NAT allows you to map a private IP address to an IP address from out of a pool of public IP addresses. The router will dynamically pick an unassigned address from the pool. The dynamic entry will stay in the NAT translations table as long as the traffic is exchanged. After a period of inactivity, the entry wll time out and the global IP address will be available for new translations.
With dynamic NAT, you specify two sets of addresses on your Cisco device:
- the inside addresses that will be translated.
- a pool of public IP addresses.
To configure dynamic NAT, the following commands are required:
1. configure the router’s inside interface using the ip nat inside command.
2. configure the router’s outside interface using the ip nat outside command.
3. configure an access list that has a list of the inside source addresses that should be translated.
4. configure the pool of global IP addresses using the ip nat pool NAME FIRST_IP LAST_IP netmask SUBNET_MASK command.
5. enable dynamic NAT with the ip nat inside source list ACL_NUMBER pool NAME global configuration command
Consider the following example:
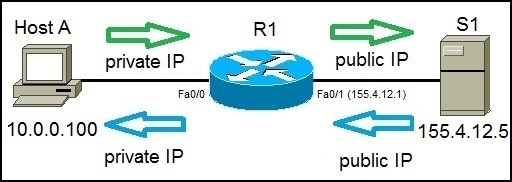
Host A requests a web resource from S1. Host A uses its private IP address when sending the request to router R1. Router R1 receives the request, changes the private IP address to one of the global addresses in the pool and sends the request to S1. S1 responds to R1. R1 receives the response, looks up in its NAT table and changes the destination IP address to the private IP address of Computer A.
Here is how we can configure dynamic NAT for the network pictured above:
First, configure the router’s inside and outside NAT interfaces:

Next, we need to configure an ACL that has a list of the inside source addresses that will be translated:
![]()
Now we need to configure the pool of global (public) IP addresses:
![]()
Next, we need to enable dynamic NAT:
![]()
The command above tells the router to translate all addresses specified in the access list 1 to the pool of global addresses named MY POOL.
To verify NAT, we can use the show ip nat translations command:

In the picture above, you can see that the translation has been made between the Host A’s private IP address (Inside local) to the first available public IP address from the pool (Inside global).