RIP configuration
RIP is a very simple routing protocol and its configuration is pretty straighforward. You just need to enable RIP on the router and define which network to advertise. Here is how it is done:
- (config) router rip – enables RIP on the device.
- (config-router) version 2 – specifies that the version 2 of the protocol will be used.
- (config-router) network NETWORK_ID – defines the network which will be advertised. This command takes a classful network as a parameter and activates RIP on the interfaces whose addresses fall within the specified classful networks.
Consider the following example network:
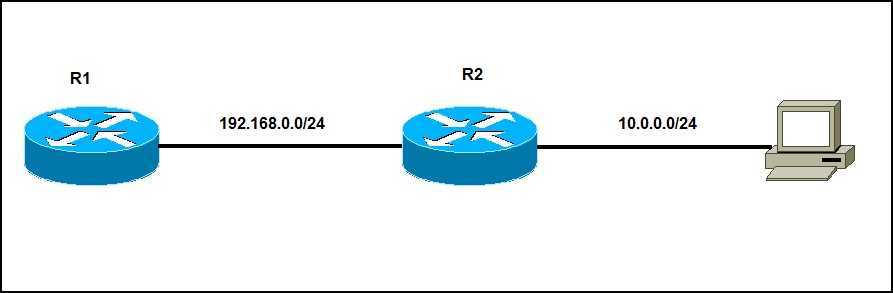
In the picture above you can see that we have a small network of two routers and a single computer. R2 is directly connected to the 10.0.0.0/24 network. We want to advertise that network to R1 using RIP. Here are the configuration steps:
1. On R1, we need to enable RIP and activate it on the interface connected to the 192.168.0.0/24 network:
![]()
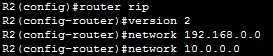
2. On R2, we need to enable RIP, activate it on the interface connected to the 192.168.0.0 network and advertise the 10.0.0.0/24 network:
3. To verify if RIP is indeed advertising routes, we can use the show ip route command on R1:
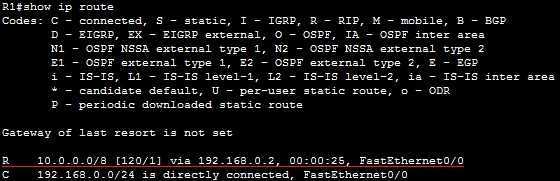
4. You can see that R1 knows about the 10.0.0.0/24 network. The letter R indicates that the route was learned using RIP. Note the administrative distance of 120 and the metric of 1 [120/1].
Remember that the network command does two things:
- advertises the defined network in RIP.
- activates RIP on the interfaces whose addresses fall within the specified classful networks.